
After OS X El Capitan is available to the public, many are eager to download and install. But not a few people asking how to create a bootable USB installer for OS X El Capitan. Before you go to the tutorial, I explain first glance on a bootable USB installer for OS X El Capitan.
Bootable Recognize Installer

Since OS X Lion, Apple no longer sells the operating system in the form of a DVD. In the early days of hell they give OS X Lion Recovery drive for free in the sales package. This exclusive Flash Drive contains installation files for the MacBook Air and MacBook Pro Retina because there is no DVD slot. Its main function is doing a clean install without the need to re-download the document OS X that is larger than 5GB.
Another function that is not less important is to do a variety of settings such Disky Utility Repair Disk Permissions or can also do Reset Password via Terminal.
Well getting here, users can also create their own bootable USB fact. Requirement is easy, a minimum of 8 GB Flash Drive and OS X Installer file that can be downloaded from the Mac App Store. How do I make a bootable OS X to your Flash Drive? There are two ways that I know, via Terminal and use the application help DiskMakerX.
Via Terminal, Pretty Hard
On the Apple Support page actually has no tutorial to make you into a bootable flash drive installer. The concept is simple, you need to download the OS X installer on a Mac computer then call Terminal and run the tools createinstallmedia.
These are tools that you copy the installer files and eliminate the two step process into a step bootable installation only. Here is an excerpt :
To learn how to use createinstallmedia, use the following command in Terminal:
OS X El Capitan
/Applications/Install\ OS\ X\El\ Capitan.app/Contents/Resources/createinstallmedia
Example:
sudo /Applications/Install\ OS\ X\ El\ Capitan.app/Contents/Resources/createinstallmedia –volume /Volumes/Untitled –applicationpath /Applications/Install\ OS\ X\ El\ Capitan.app –nointeraction
Easy steps, via DiskMakerX
Use third-party applications that DiskMaker X With free applications and small size, all these steps will be simplified by pressing a few buttons. Here are the steps :
1. Download the latest on the page DiskMakerX developers.
2. Install and prepare documents El Capitan OS X installer you've downloaded in the Mac App Store.
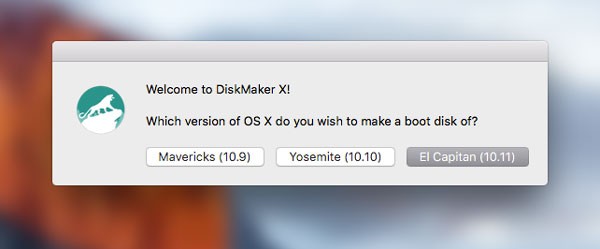
3. Press the El Capitan (10:11), after it DiskMaker X OS X installer will detect that you have.
4. Continue this step by selecting the storage media to be formatted and some of the views approvals for further processing.

5. An important note, the process of creating a bootable installer in DiskMaker X did show a progress bar which is flat, there is no oncoming line. So do not trigger feelings of failure.

6. Additional troubleshooting, close all running applications when you use DiskMaker X so that the maximum load of RAM can be used by this application. Connect the charger to a Mac computer can also be additional advice to ensure you do not stop the process if it runs out of battery.

Once completed, the Flash Drive you will display a Finder window as shown above. That means you are ready to use a bootable OS X installer El Capitan to reinstall or repair the troubled OS X on other computer.
Download DiskMaker X
-
PrevoiusYou are viewing Most Recent Post
-
Next
No Comment to " Bootable Installer OS X El Capitan "