News Ticker

Latest Posts
Browsing Category "Tutorial"

Bootable Installer OS X El Capitan

- No Comments

After OS X El Capitan is available to the public, many are eager to download and install. But not a few people asking how to create a bootable USB installer for OS X El Capitan. Before you go to the tutorial, I explain first glance on a bootable USB installer for OS X El Capitan

Bootable Recognize Installer 


Since OS X Lion, Apple no longer sells the operating system in the form of a DVD. In the early days of hell they give OS X Lion Recovery drive for free in the sales package. This exclusive Flash Drive contains installation files for the MacBook Air and MacBook Pro Retina because there is no DVD slot. Its main function is doing a clean install without the need to re-download the document OS X that is larger than 5GB. 

Another function that is not less important is to do a variety of settings such Disky Utility Repair Disk Permissions or can also do Reset Password via Terminal. 

Well getting here, users can also create their own bootable USB fact. Requirement is easy, a minimum of 8 GB Flash Drive and OS X Installer file that can be downloaded from the Mac App Store. How do I make a bootable OS X to your Flash Drive? There are two ways that I know, via Terminal and use the application help DiskMakerX.

Via Terminal, Pretty Hard 

On the Apple Support page actually has no tutorial to make you into a bootable flash drive installer. The concept is simple, you need to download the OS X installer on a Mac computer then call Terminal and run the tools createinstallmedia. 

These are tools that you copy the installer files and eliminate the two step process into a step bootable installation only. Here is an excerpt :
To learn how to use createinstallmedia, use the following command in Terminal: 

OS X El Capitan 

/Applications/Install\ OS\ X\El\ Capitan.app/Contents/Resources/createinstallmedia 

Example: 

sudo /Applications/Install\ OS\ X\ El\ Capitan.app/Contents/Resources/createinstallmedia –volume /Volumes/Untitled –applicationpath /Applications/Install\ OS\ X\ El\ Capitan.app –nointeraction

Easy steps, via DiskMakerX 

Use third-party applications that DiskMaker X With free applications and small size, all these steps will be simplified by pressing a few buttons. Here are the steps : 

1. Download the latest on the page DiskMakerX developers. 

2. Install and prepare documents El Capitan OS X installer you've downloaded in the Mac App Store. 

3. Press the El Capitan (10:11), after it DiskMaker X OS X installer will detect that you have. 


4. Continue this step by selecting the storage media to be formatted and some of the views approvals for further processing. 


5. An important note, the process of creating a bootable installer in DiskMaker X did show a progress bar which is flat, there is no oncoming line. So do not trigger feelings of failure. 


6. Additional troubleshooting, close all running applications when you use DiskMaker X so that the maximum load of RAM can be used by this application. Connect the charger to a Mac computer can also be additional advice to ensure you do not stop the process if it runs out of battery. 


Once completed, the Flash Drive you will display a Finder window as shown above. That means you are ready to use a bootable OS X installer El Capitan to reinstall or repair the troubled OS X on other computer. 

 Download DiskMaker X

Review Apple Music iOS 9

- No Comments

Apple officially released Apple Music as a full extra streaming music service. You can enjoy music content, video, radio and interaction with idols via Connect. If the reviews Apple Music on a Mac already we represent, now turn to review Apple Music in iOS 9. Let us examine a variety of basic knowledge and how to use the Apple Music on iOS devices. 

How to Enjoy the Apple Music? 


First of course you have to use iOS devices (iPhone, iPad and iPod Touch) with a minimal operating system iOS 8.4 or iOS 9 Public Beta 2 or iOS Developer 9 Beta 3. Are Apple Music is present as a separate application? Of course not, Apple Music is present in the Music application that brings a new icon with a white background. 

After making sure you use a device that supports iOS, login in the App Store or iTunes Store with the Apple ID. Make sure you have a balance or a credit card payment system to be able to try out Apple Music for 3 month trial. 

It is used Apple as a key condition to try to free future Apple Music The new balance will be cut in the fourth month when the free trial period is completed. You could say this piece is quite unique, unlike other music streaming services. Looks like Apple is deliberately doing that to screen users who really want to enjoy the service. 

Initial View Apple Music 


At the beginning you will get a view Tell us what you like, that is a series of circular contains the kind of music that you like. If completed, press Next to choose a stage name that Apple Music algorithm can work more detail. End this part by press Done

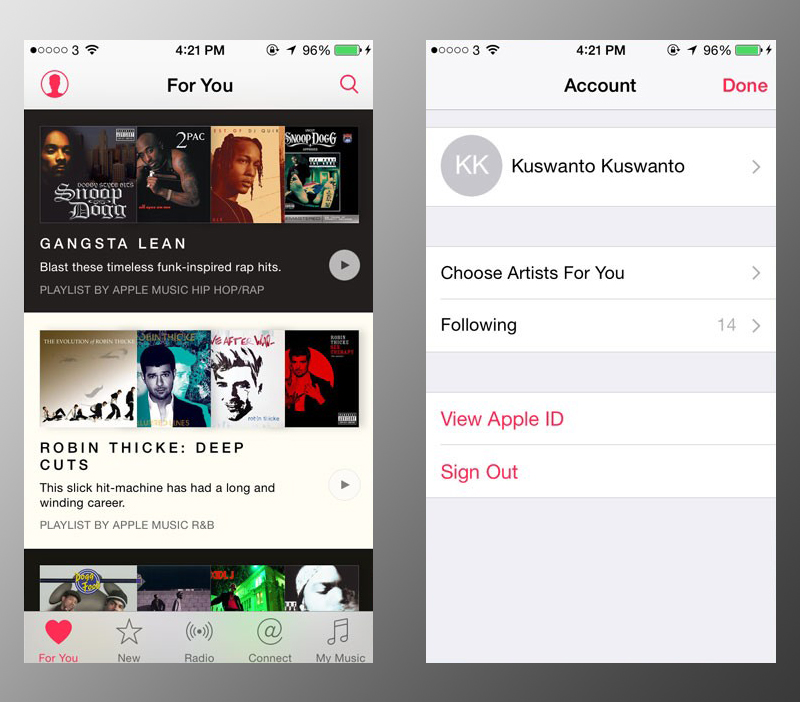
Go to the main display, there are five buttons that you can access at the bottom. From left to right they are For You, New, Radio, Connect and lastly My Music. 


For You is a row of songs and playlists option provided by Apple, based on the type of music and artists that you choose at the start. Playlist shaped upper row alias few songs with the same theme of a collection of the artist. Scroll down a bit and you will see recommended album, then headed back to the Playlist again. 

New contains information about the latest music released in the Apple Music. Characterized by Hot Tracks list, New Music, Top Songs and various other things. For you who love to listen to the songs that were popular or a new release, this section can become the main reference. 

Radio shows one of the new features in Apple Music ie 1 Beats Radio broadcasts 24 hours non-stop for seven days each week. You can see the schedule of radio broadcasts on page Beats 1 Tumblr Apple Music

Connect is where you interact with the favorite musicians. They can share a photo or video content exclusively about the recording is done, day-to-day activities or other things. As a fan, you can leave a comment, sign Like or share the note. 

My Music is the most important part in the Apple Music. You could say this is a Music Library with a new style alias supports iCloud Music Library. Users can view a list of music that have been synchronized to iCloud Music Library of Mac computers, the list of songs from the Apple Music that has been marked or downloaded to be played offline or other things. 

iCloud Music Library? 


Still many are confused about this feature and fear to try. iCloud services Music Library is an online library that will store your music data with iCloud account. 

Like the example you're using a MacBook Air devices and enable iCloud Music Library at the Apple Music subscription. Apple will scan the music data is there then do a comparison of the data in iTunes. If found the same data, you can immediately enjoy the content on other devices connected to iCloud Music Library. Suppose iPhone 6 or iPad devices. 

So what if no one, for example a song from a music CD American artists who are not sold on iTunes? Content earlier will be uploaded from iTunes on your computer to the Apple server, to be enjoyed on your other devices. The full explanation please go to page Apple Music iCloud section. 

How to Use Features My Music 

Still confused to enjoy the songs that are on the For You or New easily? Here I give an example. 

Starting from the New button, try searching for the name of your favorite artist in this section. Tap the magnifying glass icon at the top right and then type the name of the artist or song title. Make sure the button below lead to the selection of Apple Music. There are certainly some search results, please choose what you want and then press. 


Go to the main view of the artist, there is a list that can display you choose. Start of favorite songs and favorite album, a complete list of albums and a variety of other things. Tap the icon in the 3 horizontal point on the right side of the list to add it to your My Music, go to the Playlist or download and listen without an internet connection (offline), For the record, the song that goes to your My Music does not mean that has been downloaded for offline. But on the contrary, have you downloaded songs offline, must have entered the list of My Music. 

How to View Songs Already Downloaded? 


How do I see the music that has been downloaded offline only categories that exist in the My Music? Please go to the My Music, press the red text in the middle (in the picture I was Album) to show another display mode. Scroll a bit down and turn buttons Music Available Offline. 

That way you will see only songs that have been downloaded any time and play them without using an Internet connection. 

Take advantage of the Mini Player 


Has begun to play your favorite song by Apple Music? Let's see, in the top row of five icons at the bottom, there is information about the song being played, right? This section is called the Mini Player, there are three parts that you can press the left, middle and 3 icon on the right. 

The left part is the Play/Pause button, press the center (you can also swipe up) to turn the Mini Player into fullscreen display. Then the right side for quick access to the Playlist insert, check on the iTunes Store or add that song to the My Music. 

Back to the Fullscreen view, there are a lot of buttons that you can access. Ranging from giving the sign Like, play a song before or afterwards, showing a list of the next song, or use the shuffle mode. 

Try Radio & Connect

Beats 1 is actually the same as a regular radio station you listen to, there is the music of choice and sometimes the voice of the announcer. If you want to include the song currently playing on Beats 1 to your My Music, please do the following. 

Log in to the radio, press Listen Now the Beats 1. After that activate Mini Player and press the 3  icon in the bottom right. There is an additional window as shown above, press the + icon to enter this song to My Music. As a side note, sometimes there is a session in Live Music Beats 1 and this section does not support the above tutorial. 

Continue to Connect, you can try this feature if it Follow some famous artists - certainly are fond fill Connect page. Twitter timeline zoom seemingly similar to the shape of a post such as pictures or short video sometimes. Like fans can give a sign, leave a comment or press the Share Extension icon in the lower right. 

Still Confused by Apple Music? 


For the record, I wrote this article using your iOS device 9 Developer Beta 4. If there are some features that are not available on your device (Home Sharing for example) is due to the influence of the operating system being used will soon be together in the update to the public. Other features in general (For You, New, Radio, Connect) tend to be equal and no significant differences.

Tools Jailbreak iOS 8.4 via OS X Official Available

- No Comments

Tim 25pp or better known as Pangu recently issued a tool PP untethered Jailbreak iOS 8.4 devices for Mac OS X

Preparation Before PP Jailbreak iOS 8.4 

The first thing you need to prepare is the iPhone, iPad or iPod touch with iOS 8.4. Also make sure the data in your device already offer secure by doing a backup in iTunes before jailbreak with iOS 8.4 Jailbreak tool PP. 

The next step is to make sure Passcode Lock and Find My iPhone in a disabled state. For the Passcode Lock settings, you can set it in the menu Settings > Passcode. While the Find my iPhone is in Settings > iCloud > Find my iPhone > OFF

The final step is to download the tools Taig 2.0 of Pangu team's official website by accessing this link

Steps Jailbreak iOS 8.4 
 
  1. Connect your iOS device to a Mac computer yours, 
  2. Turn on Airplane mode on iOS devices, 
  3. Run ppjailbreak.dmg file you've downloaded. 
  4. Make sure you do not check the option Install PP helper, 
  5. Once the iOS device is detected by the tool PP yours Jailbrak iOS 8.4, please press the Continue button to begin the process Jaibreak by ensuring Internet connections in a state is quite stable. 
  6. Finish, you've done the Jailbreak process smoothly and simply find the Cydia app on your iOS device homescreen as a mark already successfully jailbreak you did. 

Those who are still confused with the steps above, you can listen to the full tutorial video below : 


So easy is not the steps jailbreak tool jailbreak iOS devices with iOS 8.4 Jailbreak PP's.

How to Stop Automatic Subscription Renewal Apple Music

- No Comments

Have you already tried the Apple Music on iOS 8.4 or iTunes software on a Mac computer? As already discussed ngulireceh users can sample the service for free within 3 months of the start but must "show" for the balance of the subscription. If the fourth month later you do not wish to continue the subscription, the following tutorial to stop features Automatic Renewal : 

Stopping Auto Renewal Apple Music via iPhone 

The first step of course you have already subscribed to this service. If you still do not understand, please read the review articles and tutorials Apple Music. Okay, let's continue the steps : 

1. Go to the Music app, select the account icon in the upper left to go to the account settings. Select View Apple ID and enter your account password in the window that appears. 


2. Scroll down and press a little button under the label Manage Subscriptions. 

3. Now turn on and turn off Renewal Options button next to the text Automatic Renewal. End this setting by pressing the Done button. 


Stopping Auto Renewal Apple Music via iTunes on OS X 

1. Open the iTunes app and press the icon with the list name at the top right of the screen. Please press the Account Info button and enter your account password. 


2. Display your iTunes will display a variety of information about the account being used. Scroll down to the section Settings > Subscriptions > Manage


3. In the Automatic Renewal, please press the OFF button and save the settings by pressing Done in the lower right. 


Do you want to subscribe to Apple Music? Please press the button below to access to quikly and easily. 

Press Here

8 Utilizing Intelligent command Siri on Apple Music

- No Comments
 

Since Apple released iOS 8.4 and Apple Music you not only enjoy music and video content, Apple Music also supports control via Siri Here are some simple commands to make you enjoy the Apple Music is getting easier. 

1. Play All Songs 


Only by speaking commands to Siri : "Play All Songs", an intelligent assistant will ask Apple Music plays all the songs on your iPhone or iPod at random (shuffle)

2. Skip 


You don't like the song playing? You do not need to go into the Control Center or Apple Music to change it, use the command "Skip". Siri will change the song playing to the next list quickly. 

3. Give Signs Likes or Rating 


Apple Music has Likes features and Rating with star sign, surely you already know this. The section serves to help the algorithm compiling a list of songs on the menu For You become better. If you want to give the marks on the song currently playing, use this command : "Like this song" or "Give 5 stars"

4. Rotate A Song After This 


Do you want to listen to a song without stopping being played now? Use this command: "After this song play (the title song)". I prefer these commands rather than having to suddenly change the currently playing song to another song. 

5. Indicate Playlist 


Siri can help you show the song list and the various streams of music on Apple Music. Just use simple commands like "Play the top songs from 2014" or with sentences such. Calm, do not be afraid of now that Siri is very intelligent. 

6. Like the song? Enter to My Music 


Apple Music has named My Music tab that contains a list of songs that you enter into the library - either not downloaded or already can be listened to offline. Please say a command "Add this song to my library" to save to My Music. 

7. Guessing Singer & Title Album 


Instead of having to go to the Apple Music and see a list of the information, you can ask Siri to show who the singer of the song from the album or anything. Use the command "Who sing this" or "What album is this from" to do 2 so. As a side note, make sure you're playing the songs that do not go in pause mode or Siri can not help you find the information. 

8. Setting Timer for Apple Music 


If you often listen to music before going to sleep for an hour and want the iPhone and the iPad breaks when you go to sleep, use the Timer feature with the following command : "Set the timer for Apple Music". After that Siri will respond with how much time you want to adjust, type or say just one hour, for example. 

Now you can enjoy music played during that time. No need to fear the iPad or iPhone you up all night playing music, there are timers that will stop your son

How to Switch Widget Notification Center in OS X Yosemite And iOS 8

- No Comments

Widget features that you can enjoy on a Mac with OS X Yosemite and iOS 8 start ogled third-party application developers. How do I use a widget? refer to the discussion and tutorials using the widget below. 

Widgets are small applications or parts of an application that is easy to use and accessible at all times. For OS X and iOS devices themselves, Widget can be accessed from the Notification Center on the Today. 

There are two kinds of Widget stands alone as the "Widget intact" the application itself is functioning as the basic settings. While the second type is Widget as a supplement or can access quickly to do some things without opening the main application. No application for this type of Things, productivity apps OneNote and some kind. For additional information, Apple limits the ability of widgets in iOS 8 for editing documents or send instant messages, for example to ensure the security of iOS ecosystem as a whole. 

Widgets are now available on iOS 8 and OS X Yosemite course for applications that already support these features. Here's how to enable it : 

How to Switch Widget in iOS 8


1. Access your Notification Center - swipe down from the top of the iOS device 8.

2. Press Today then scroll down and tap the Edit button. 

3. Please find an application that already supports widgets and want Kamuu activate. Press the + button on the left side lists each application to make it active. 

4. Adjust the position of widgets that will appear by pressing and hold the line mark next to each application and then slide it up and down. 

5. End the setting by pressing the Done button. 

How to Switch Widget in OS X Yosemite 

For widgets in OS X Park, there are two ways to turn on the iOS 8 Notification Center directly as or of application System Preferences. 

The first way 

1. Access Notification Center in OS X by pressing the 3 line list icon in the upper right corner of the screen. You can also use a trackpad gesture on Macbook Pro for example with 2 finger swipe from right outside the entrance to the left (turn first through System Preferences > Trackpad > Mote Gestures). 


2. In Notification Center, press Today then continue by pressing Edit at the bottom. 

3. Please add favorite Widget by pressing the + button in the right column. Similar in iOS 8, you can tidy up the sequence by pressing the horizontal line kana side piled on each list widget. 


Second way 

1. Open the System Preferences > Extensions > Today

2. Unlock Widgets from any application that supports with a check mark in the right coloumn.


3. If you are finished selecting widgets, end the arrangement by closing the System Preferences application yes.

The second way does not support setting the order of the way first. Access is also a bit complicated because it had to open the System Preferences beforehand. Supports with a check mark in the right column.

Cisdem Datarecovery 3 for Mac Review

- 1 Comment


Loss of important data from internal or external hard drive media is bad news for you. If you are experiencing this problem and is associated with the working documents, photos or other device OS X yours, you can use DataRecovery Cisdem 3 for mac. 

Cisdem DataRecovery 3 

Cisdem DataRecovery 3 offers a variety of advantages over other data recovery applications. Ranging from support to a variety of internal or external storage media and of course a variety of file system (FAT, NTFS, HFS and so forth). 

Excess second is the search for the missing data in the required format only. For example, you want to find the lost image data in the Flash Drive, just select Media Recovery mode just to make it work faster. Instead, users can choose Universal Recovery to find all types of data. The third course is the ease of use that only consists of three steps. 

In accordance with the notes written on their Web pages, how to use DataRecovery Cisdem 3 consists of only three easy steps. Select storage Capacity > Scan > Restore data


The picture above is the initial interface Cisdem DataRecovery 3. Users can choose the features to restore data more specific and this time I use Media Recovery option. Press twice to enter the mode and select the storage media that you want to scan. End this section by pressing the Scan button on the bottom right. 


Log in to the process of scanning or scan data, users simply wait for the process is carried out by Cisdem DataRecovery 3. Length of time depends on how large the storage capacity and how much data have been found. In my experiments with this 8GB SD Card only takes about 15 minutes to complete. 


After completion of the scanning process, Cisdem DataRecovery 3 will display your data as shown above. The information is very minimalist, just kind of data and extensions as well as the size of the document. The name of the document that is used must already changed the name of the index - because the part is quite difficult to be restored. 


The final step of the process of data recovery is to choose the document you want to get back and press the Recover button. After pressing the button, a new display window will ask you to choose a destination folder as necessary. Just let me easily create a folder on the Desktop Cisdem Recovery example. Now just waiting for the data transfer process was completed. 

How To Display Explicit Content In The Apple Music

- No Comments
Have you already tried Apple Music with iOS 8.4 to enjoy a variety of music content interesting? Reportedly some users can't find a song or video clip with the label Explicit or 17+ content on the service. Even users who have purchased content can not sync from iTunes to iOS devices or (disabled ). If you are experiencing similar things, don't panic. 


This is a new policy of Apple to be more concerned with users who use Family Sharing feature - especially children . You can go back to show Explicit content labeled with the following tutorial : 

How to display the Explicit Content in the Apple Music 

1. Go to the Settings > General > Restrictions

2. Activate the first mode if you have not used it so far. Set a passcode and make sure you do not forget it. 

3. Scroll down and go into the Music & Podcasts > Explicit ON. 


Share this article on your friends are experiencing similar problems and have yet to find the answer.